Web Scraping Medium Articles with Scrapy: From Simple to Advanced (part II)
How to organize a web scraper using good software practices using Scrapy and Python.

Introduction
In Part I, a VERY simple but ethical and efficient web scraper was built to extract data from Medium’s article collections using Scrapy. In Part II we'll start incorporating the single script created in Part I into a bigger picture.
Instead of dealing with a single script, we'll create a project for our web scraper and apply the Separation of Concern principle while taking advantage of Scrapy's features, such as Item, Item Loader and processors.
This can be useful since scraping data from websites can get quite messy sometimes due to many reasons, such as multiple data sources, data management or simply due to bad code.
Fortunately, Scrapy can be quite helpful to alleviate this problem!
Since Scrapy is an opinionated framework, it allows you to build and maintain web scraping projects following good software development practices in an organized fashion.
Objectives
In this article, I’ll show you how you can use different basic concepts to better organize a web scraping project, using as reference the simple spider coded in the Part I. For this, we’ll cover the following topics:
- Define what is an Item
- Define what is an Item Loader
- Define input and output processors
- Demonstrate how all these concepts together in a very simple but practical example
- Incorporate all these concepts in the spider built in Part I
Project Template from Scrapy
You can create a new Scrapy project by entering the directory where you’d like to store your code and run the following command:
scrapy startproject medium_scraper
This will create a directory with the name of medium_scraper in the same directory with following contents:
├── scrapy.cfg        # deploy configuration file
└── medium_scraper    # project's folder, you'll import your code from here
    ├── __init__.py
    ├── items.py            # project items definition file
    ├── middlewares.py      # project middlewares file
    ├── pipelines.py        # project pipeline file
    ├── settings.py         # project settings file
    └── spiders             # a directory where spiders are located
        ├── __init__.py
For this tutorial, what you need to know about are the following:
spiders folder
The spiders folder is a directory which contains all the spiders/web crawlers as Python classes. Whenever one runs any spider, scrapy looks into this directory and tries to find the spider associated with the executed script or name.
Spiders define how a certain site or a group of sites will be crawled and how to extract data from their pages. The spider created in Part I will be located here.
settings script
It allows one to customise the behaviour of all Scrapy components, including the core, extensions, pipelines and spiders themselves. It provides a GLOBAL namespace of key-value mappings that the code can use to pull configuration values from.
However, these configurations can be overwritten by redefining its values inside a Spider class. By doing so, we can easily configure each spider's settings individually as needed.
item script
It is in this script where we define the Item classes to be used in our spiders. We can also put raw data processing here as custom processors, as will be shown later in this article.
Item and Item Loaders
Item and Item Loader are concepts that enable us to better organize the code from our spider. When Item Loaders are used with input and output processors, the raw data processing is greatly enhanced, making the spider not only more robust but capable of scraping cleaner data.
You could think of it like this: Items provide the container of scraped data. Item Loaders provide the mechanism for populating that container.

What is an Item?
Items are Python objects that define key-value pairs. Item instances are simply containers used to store the extracted data. It works very similarly like Python dictionaries, but has additional features that makes them more appropriate for code organization and robustness.
All Items subclasses should be defined in the items script, which is already created by default by Scrapy. Since Item provides a dict-like API to store scraped data, its declaration is quite simple, as can be seen below:
import scrapy

class ExampleItem(scrapy.Item):
    # define the fields for your item here like:
    # name = scrapy.Field()
    pass
According to the documentation, the main goal of Field objects is to provide a way to define all field metadata in one place. It’s important to note that the Field objects used to declare the item do not stay assigned as class attributes. Instead, they can be accessed through the Item.fields attribute. This will be shown later in an example.
And that’s it! Our Item is defined, now we just need to populate it with the scraped data!
What is an Item Loader?
Although items can be directly populated with data by the spider, using Item Loaders is a much more convenient way to populate them during the web scraping. Item Loaders can automate some tasks like parsing the raw extracted data before assigning it.
To use the Item Loader in order to extract data from web pages, it needs an Item and a source of data, which can be given to the selector or response argument.
class scrapy.loader.Item Loader(item=None, selector=None, response=None, parent=None, **context)
- item (scrapy.item.Item) – The item instance to populate.
- selector (Selector object) – The selector to extract data from.
- response (Response object) – The response used to construct the selector. If the selector argument is already given, this argument is ignored.
There are three methods from which we can feed data to our Item Loader instance, which in turn can process it and populate the Item instance:
- add_value(field_name, value, processors, *kw) - process and then add the given value for the given field.
- add_xpath(field_name, xpath, processors, *kw) - receives an XPath selector instead of a value, which is used to extract a list of strings from the selector.
- add_css(field_name, css, processors, *kw) - receives a CSS selector instead of a value, which is used to extract a list of strings from the selector.
What are input and output processors?
One of the benefits of using Items and Item Loaders is the possibility to use processors. Processors are objects which get called with the data to parse and return a parsed value. By doing so, Item Loader provides a flexible, simple and efficient way to extend and override parsing rules for different Item fields. This makes our web crawling project easier to maintain due to Separation of Concerns, but also enables us to make our spider more robust and deliver cleaner data.
An Item Loader has an input processor and an output processor for each item field. The input processor deals with the extracted data as soon as it is received. Once this data is parsed and processed, it is appended to an internal list. This allows Item Loader to have many values for one Item Field, as will be shown in an example. Then, the results of this internal list are fed to the output processor. Finally, the result of the output processor is assigned to the Item Field.
After the data is collected, the Item Loader.load_item() method needs to be called in order to populate the item object. That’s when the output processor is called with the data previously collected(and processed by the input processor.
Input and output processors can be defined in the Field argument and can be chained together with other processing functions.
Scrapy already comes with six built-in processors: Identity, TakeFirst, Join, Compose, MapCompose and SelectJmes. You can check out more about them here.
A simple example
The code below illustrates how Item, Item Loader and the processors can be used together. In the code, a custom Item is defined and used inside an Item Loader. The Item has two fields. One of them without any processor, and the other with both input and output processors.
import scrapy
from scrapy.loader import ItemLoader
from scrapy.item import Item, Field
from itemloaders.processors import TakeFirst, MapCompose

class CustomItem(Item):
    first_field = Field()
    second_field = Field(input_processor = MapCompose(str.upper))
    third_field = Field(
        input_processor = MapCompose(str.upper),
        output_processor = TakeFirst()
        )

item_loader = ItemLoader(CustomItem())

# Add Name 1, Name 2 and Name 3 strings to all fields
for field in CustomItem().fields:
    item_loader.add_value(field, 'Name 1')
    item_loader.add_value(field, 'Name 2')
    item_loader.add_value(field, 'Name 3')

print(item_loader.load_item())
The output of this code is:
{'first_field': ['Name 1', 'Name 2', 'Name 3'],
 'second_field': ['NAME 1', 'NAME 2', 'NAME 3'],
 'third_field': 'NAME 1'}
Now suppose that we are scraping an online marketplace and we want to scrape the name of a product. Let’s suppose that the name of the product can appear in different places. In a simple web scraper, we could scrape the data from one of these places and get the name of the product. In a more robust spider, we could scrape the data from ALL of these places in order to try to guarantee that our web scraper will return at least one of them or all of them if you wish to.
This is what the script above does. The first_field is the raw data. The second_field is the processed data of all the raw_data fed to the input_processor. If a single value is enough, the third_field provides at least one (the first) processed value from all the data fed to it.
Scraping time!
Considering that in the Part I we created a simple spider with all the code in a single script, in the present article this spider will be reworked by implementing separation of concerns and using more of what Scrapy can offer us, such as Item, Item Loader and processors. This will make the spider not only more robust for data scraping, but more organized and maintainable.
Also, since we can easily add multiple sources of data using Item Loaders, we will add another source of the Title data in our spider to demonstrate this. We will see later in the article how this can make our data scraper much more robust and efficient.
Spider with Item
In this part of the project, I’ll modify the spider in order to use Item and Item Loader, and also organize the raw data processing code into functions to be used along with the input and output processors. That is, we’ll refactor our spider in order to make the code cleaner, but still, the behavior of the spider itself won’t be drastically changed.
Creating and Item for our spider
The first step is to create an Item for our spider in the items script of our project folder. Each Field of our Item will correspond to the data we are scraping, defined in Part I but also defined in the code below:
import scrapy
from itemloaders.processors import MapCompose
from datetime import datetime
from decimal import Decimal

class MediumScraperItem(scrapy.Item):
    author = scrapy.Field()
    title = scrapy.Field()
    subtitle_preview = scrapy.Field()
    collection = scrapy.Field()
    read_time = scrapy.Field(input_processor=MapCompose(getNumericReadTime))
    claps = scrapy.Field(input_processor=MapCompose(text_to_num))
    responses = scrapy.Field(input_processor=MapCompose(getNumericResponse))
    published_date = scrapy.Field(input_processor=MapCompose(getPublishedDate))
    article_url = scrapy.Field(input_processor=MapCompose(getArticleUrl))
    scraped_date = scrapy.Field()
We’ll also add to this script the necessary raw data processing code:
def text_to_num(text):
    d = {'K': 3}
    if text[-1] in d:
        num, magnitude = text[:-1], text[-1]
        return int(Decimal(num) * 10 ** d[magnitude])
    else:
        return int(Decimal(text))

def getNumericResponse(text):
    if text == None:
        responses = 0
    else:
        responses = text.split()[0]
    return responses

def getNumericReadTime(text):
    return text.split()[0]

def getPublishedDate(published_date):
    try:
        date_object = datetime.strptime(published_date, "%b %d, %Y")
        year = date_object.year
    except:
        date_object = datetime.strptime(published_date, "%b %d")
        year = datetime.now().year
    day = date_object.day
    month = date_object.month
    formatted_published_date = datetime(year, month, day)
    return formatted_published_date

def getArticleUrl(raw_url):
    return raw_url.split('?')[0]
Since we define a Field for each data variable being scraped, we can also define custom input processors as functions, as seen above. This, in turn, makes the code much more readable and organized.
Although still simple, this is a major step from the Simple Spider, which had all the raw data processing inside the spider script.
Updating the spider script
With the custom Item created in the items script, now we need to use it inside our spider script in order to bridge the gap between the scraped data and it’s container. This is where the Item Loader comes into play. We’ll instantiate an Item Loader with the custom Item as an argument.
Inside our spider script, we’ll simply need to add the Field name and the parsed HTML or a value to the corresponding method (add_xpath(), add_css() or add_value()). This will feed the data to our Item Loader instance, which will populate the Item after the input and output processors are executed. This is shown below:
# import necessary packages

class ArticleSpider(Spider):

    name = "spider_item"
    start_urls = ['https://medium.com/hackernoon/archive']
    custom_settings = {
        'AUTOTHROTTLE_ENABLED': True,
        'AUTOTHROTTLE_DEBUG': True,
        'DOWNLOAD_DELAY': 1,
        'ROBOTSTXT_OBEY': False,
        'FEED_EXPORT_FIELDS': ['author', 'title', 'subtitle_preview', 'collection', 'read_time', 'claps', 'responses', 'published_date', 'article_url', 'scraped_date']
    }


# Calendar parsing code omitted for simplicity


    def parse_articles(self, response):
        articles = response.xpath('/html/body/div[1]/div[2]/div/div[3]/div[1]/div[2]/*')
        for article_selector in articles:
            yield self.populate_item(article_selector, response.url)

    def populate_item(self, selector, url):
        item_loader = ItemLoader(item=MediumScraperItem(), selector=selector)
        item_loader.default_output_processor = TakeFirst()

        item_loader = ItemLoader(item=MediumScraperItem(), selector=selector)
        item_loader.default_output_processor = TakeFirst()
        item_loader.add_xpath('author', './/a[@data-action="show-user-card"]/text()')
        item_loader.add_xpath('title', './/*[contains(@class, "title")]/text()')
        item_loader.add_xpath('title', './/h3[contains(@class, "title")]/*/text()')
        item_loader.add_xpath('subtitle_preview', './/*[@name="previewSubtitle"]/text()')
        item_loader.add_xpath('collection', './/a[@data-action="show-collection-card"]/text()')
        item_loader.add_xpath('read_time', './/*[@class="readingTime"]/@title')
        item_loader.add_xpath('claps', './/button[@data-action="show-recommends"]/text()')
        item_loader.add_xpath('responses', './/a[@class="button button--chromeless u-baseColor--buttonNormal"]/text()')
        item_loader.add_xpath('published_date', './/time/text()')
        item_loader.add_xpath('article_url', './/a[contains(@class, "button--smaller")]/@href')
        item_loader.add_value('scraped_date', datetime.now())

        return item_loader.load_item()
In addition to the changes made in parse_articles and the inclusion of the populate_item method, we added the FEED_EXPORT_FIELDS variable declaration in inside the custom_settings from the spider in order to save the data in a user defined order. Without it, the spider will work fine but the data (or it's columns) will be ordered alphabetically.
Running the spider
Since the only modification was the addition of an Item and Item Loader, coupled with some code refactoring on the spider script, we can still use the command line specifying the data format in which the data will be saved, just as was done in Part I. The command is:
scrapy runspider ./spiders/spider_item.py -o ./scraped_data/data_from_item.csv
The scraped data
The scraped data is very similar with the data we got in Part I, but with a major difference. The title data could be in different parts of the HTML. Instead of creating a bunch of code to try to scrape the information from different sources, we can simply pass the alternative source of data to the Item Loader, as can be seen below:
item_loader.add_xpath('title', './/*[contains(@class, "title")]/text()')
item_loader.add_xpath('title', './/h3[contains(@class, "title")]/*/text()')
The same processors will be applied, the results will be concatenated, and the first non-empty data will be returned, as seen in the example section. This not only applies the DRY principle to our project, but also makes the data scraping more robust.
In fact, the addition of this single line of code (or source of data) reduced the number of missing titles from 2021 to 164, as seen in the image below:
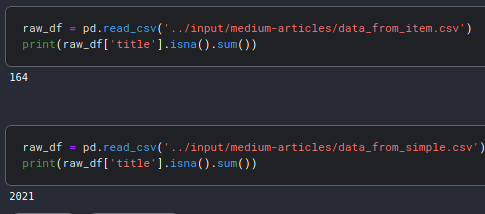
What about the other 164 missing titles? Well, some articles just don't have them:

Conclusion
The aim of this article is to show how to use different concepts from the Scrapy framework to build a robust and organized web scraper.
With Items, our data is containerized, with Item Loader we can easily populate our Item, with input and output processes our data collection gets more robust and the data itself cleaner.
And by combining these features, we can easily scrape data from different possible sources of the HTML, which is a quite common situation. In fact, with a single line of code (and data source) we have reduced the number of missing titles from 8% to 0.7% in our scraped dataset.
With all of this, the SoC and DRY principle are effectively applied and the code gets easier to debug, scale and maintain.
You can check the complete code here.
And if you have any questions or suggestions, feel free to contact me.
References and more resources
The first part of this series of articles

